DSAR-In Process
In this stage, data maps are configured as action items to process the requests. You can configure new action items here or modify existing.
Click the 'Next' button on the 'Preprocessing' configuration to reach the 'In Process' configuration page.
The Preprocessing configuration will be shown only if the Enable Preprocessing checkbox was enabled in the General section. If this checkbox is not enabled, you need to click the Next button present on the Need Additional Information configuration to proceed to the In Process configuration page.
You can also reach this tab by clicking on the 'In Process' option.

To automate the Process phase,
- Mark the Automate Phase? option as Yes.
This automation allows the system to perform the following tasks --
a. Creating the action item required In Process stage based on the Flow configuration.
b. Sending reminder emails based on the configured reminder frequency.

Send Email Notification Checkbox
The Send Email Notification checkbox controls whether email notifications are sent to the users or user groups specified in the Action Item Configuration.
When enabled: All users or groups added to the action item will receive email notifications related to the progress or status of that action item.
When disabled: No email notifications will be sent for that action item, and users will not receive updates about its progress or status.

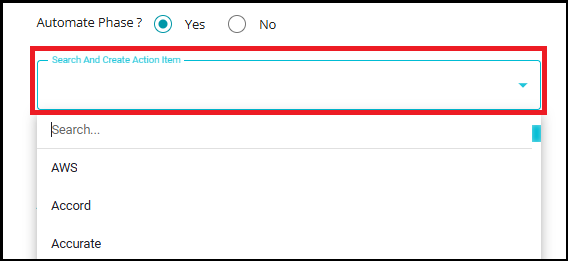
Search and Create Action Item
Click on the Search and Create Action Item dropdown to view all the DataMap systems available in the tool. You can create multiple action items by selecting different systems from this dropdown.
Each selected system will be added as an action item for the flow, allowing you to configure and manage several tasks in parallel within the workflow. This feature is useful for handling complex requests that require coordination across multiple systems.
- Upon selecting the required system, a snack bar message will appear at the bottom of the page stating "created successfully" to confirm the action item has been created.

- If you try to select a system that has already been chosen, a snack bar message will appear stating "Action item already exists". This helps prevent duplicate action items and ensures each system is only added once per request type.

To know more about creation of process action items, please refer: DSAR - User Guide.docx
NOTE: In some cases, you will be allowed to create another Action Item only upon completion of response of a dependent Reference Action Item under the same Process stage. You will also see the response of the referenced action item in it. Reference action items act as logical connectors between different tasks (action items), determining how and when a subsequent task should start based on the outcome (response) of a prior task.
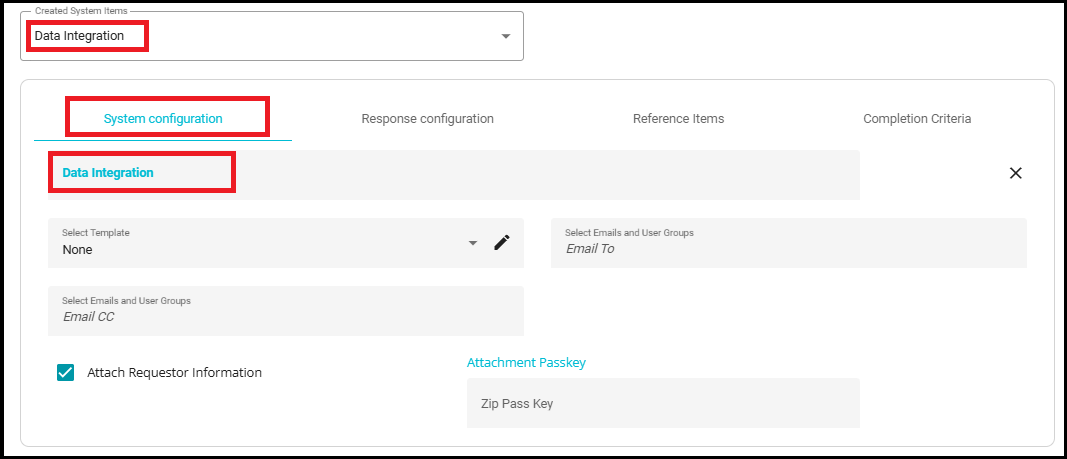
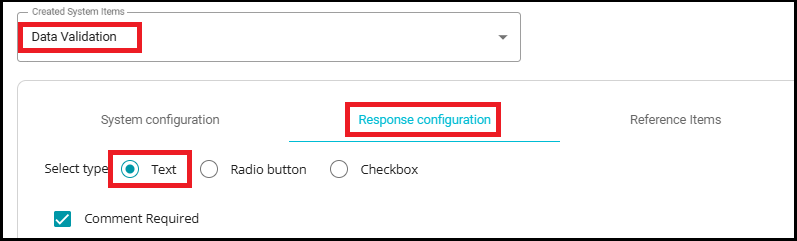
Created System Items
- The Created System Items dropdown lists all the systems you have selected and created as action items in the previous step (using the "Search and Create Action Item" dropdown). Each system in this list represents a Data map system that is now part of your request processing workflow.
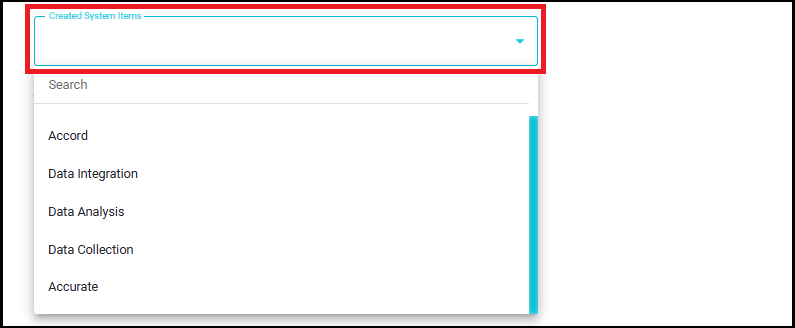
- By selecting a system from the dropdown, you gain access to detailed configuration options.
Systems (Internal Action Items):
- Action items created for systems are sent only to people who are registered in the Data Governance Tool (DGT).
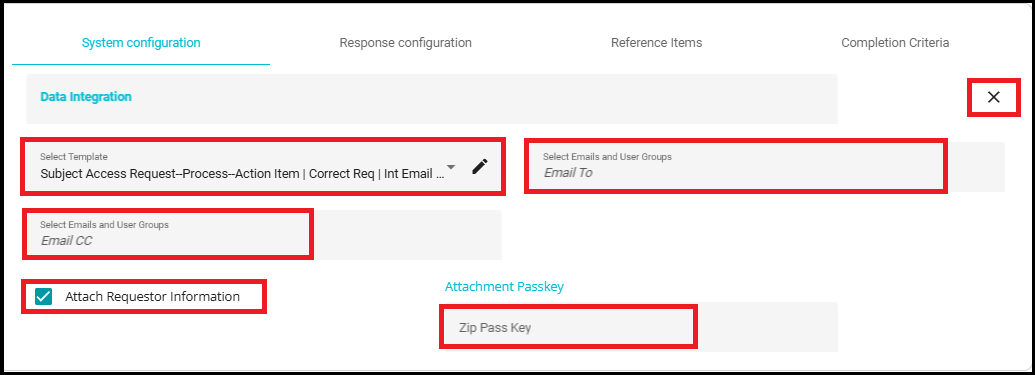
Select Template
Choose the email template you wish to send for the email or user groups, from the Select Template dropdown. This template will be used for notifications related to the action item, ensuring that the correct communication is sent to the appropriate recipients as part of your DSAR workflow.
You can edit the selected template by clicking the pencil icon. For more details on configuring email templates, please refer to "How to Configure Email Templates"
Email To / Email CC: Specify the email groups who should receive the notification.
Email To: Enter the primary recipients.
Email CC: Enter additional recipients who should be copied on the email.
Attach Requestor Information
To include the requestor information with the action item, enable the Attach Requestor Information Checkbox. This ensures that relevant details about the requester are attached to the notification or action item.
The requestor's information will be sent as an encrypted file, providing an additional layer of security for sensitive data.
Zip Passkey
- The Zip Passkey field allows you to set a password for any attachments sent with the email. If the action item includes a file or report, it can be encrypted and the passkey will be used to unlock the attachment, ensuring secure delivery of sensitive information.
Note: If no passkey is provided, the system will automatically generate a unique passkey. However, if a user specifies a passkey in the flow, that same passkey will be sent via email, allowing the recipient to access the encrypted attachment.
Delete Action Item
- To delete an action item, simply click on the X icon.
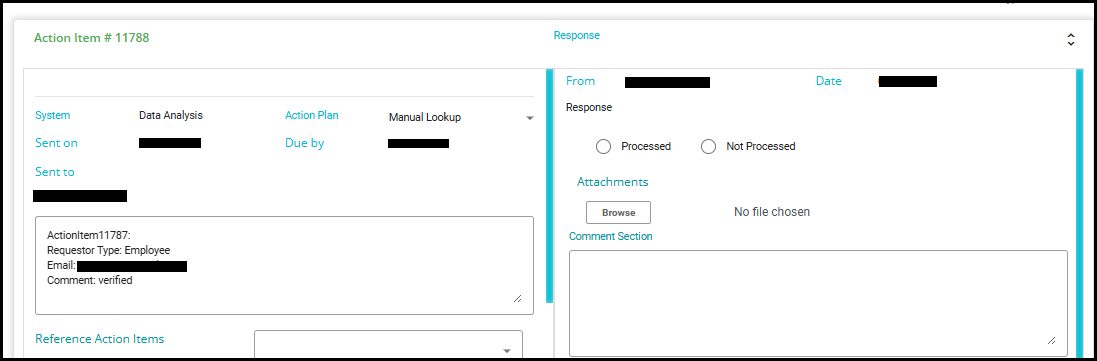
Response configuration:
This customization can be used to configure action items in the process stage based on the response received from the user. Click on the 'Response Configuration' option on the screen.
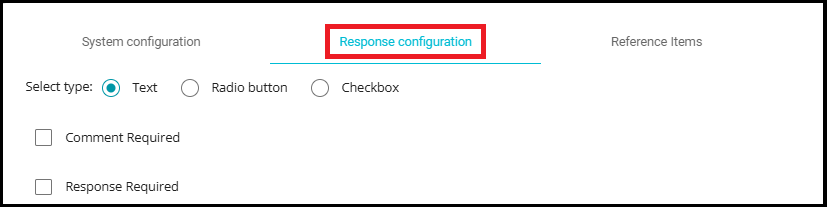
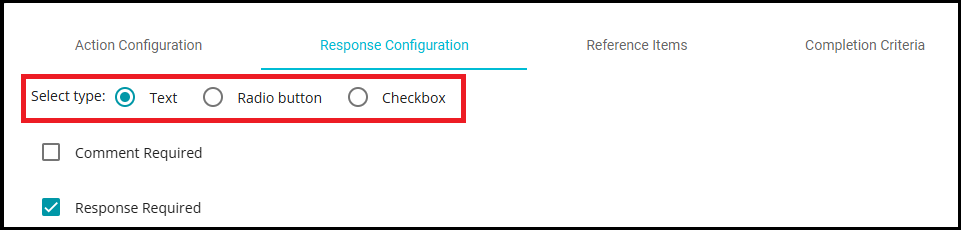
Note: The screen shows three options, Text, Radio button, and checkbox. The default selection is Text for every action item, so the existing action items aren't affected. If you want to change it, you can use the other options at requirements.
The "Text" option allows users to enter a free-form text response. This is useful when you need detailed input, explanations, or comments that are not limited to predefined choices.
The "Radio button" option lets you define a set of mutually exclusive choices. Users can select only one option from the list.
The "Checkbox" option allows you to define multiple selectable options. Users can select one or more options from the list. This is helpful when multiple actions or statuses may apply, such as "Data Collected," "Backup Created," and "User Notified", all of which can be selected if applicable.
- You can select the 'Radio button or Checkbox' option and configure the names in the 'Action item response options' dialog box by entering the required option name and clicking on enter.
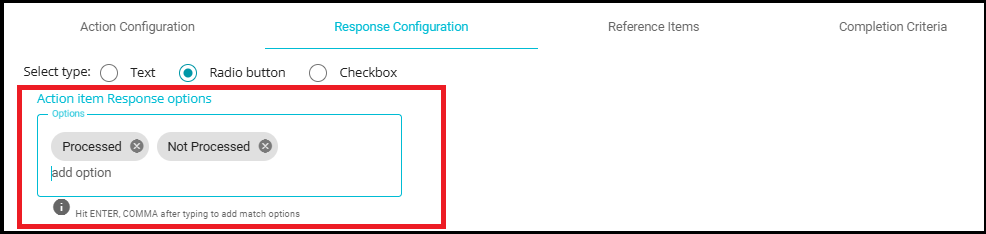
- These changes are reflected in the processor user interface, allowing the processor to view and respond according to the configured options.
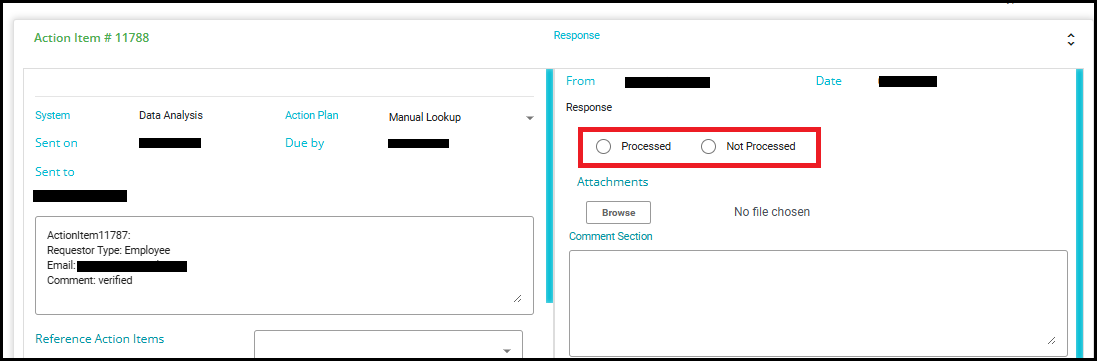
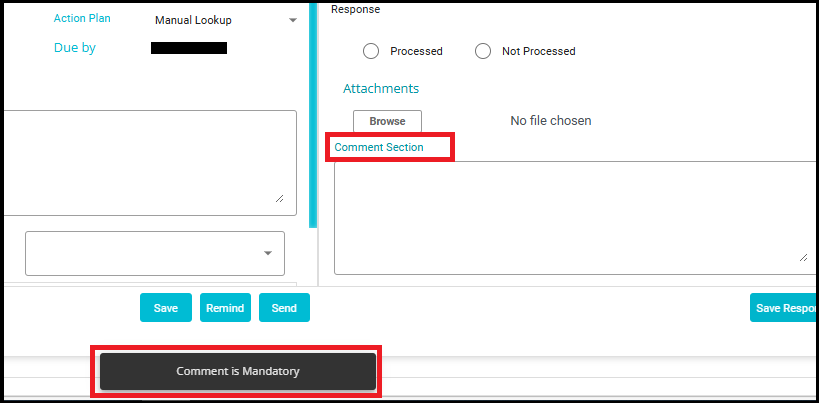
In the Response Configuration section, you have two checkboxes: Comment Required and Response Required.
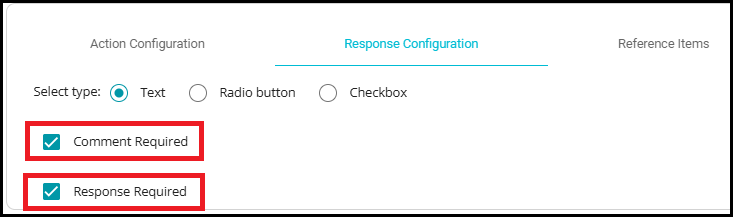
When the Comment Required checkbox is selected, the user must provide a comment in order to save the response and move forward in the workflow. If the comment is not provided, a snack bar message will be displayed stating "Comment is Mandatory."
Response Required
- When this checkbox is selected, the user must provide a response to the action item before proceeding to the next phase.
Example:
Suppose you have configured four action items for a request, and you mark one of them as "Response Required." In this case, even if the other three action items are completed, the request will stay in the Process phase until the required action item is responded to. The workflow will not move to the next phase until all action items marked as "Response Required" have been addressed. This ensures that critical steps are not skipped and that all necessary information is collected before proceeding.
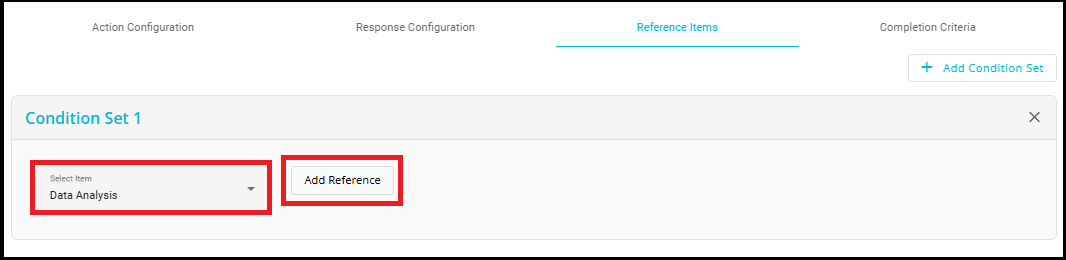
Reference Items
Click on the Add Condition Set to define reference-based rules that control the creation of subsequent action items.
Each Condition Set represents a logical group of reference conditions.
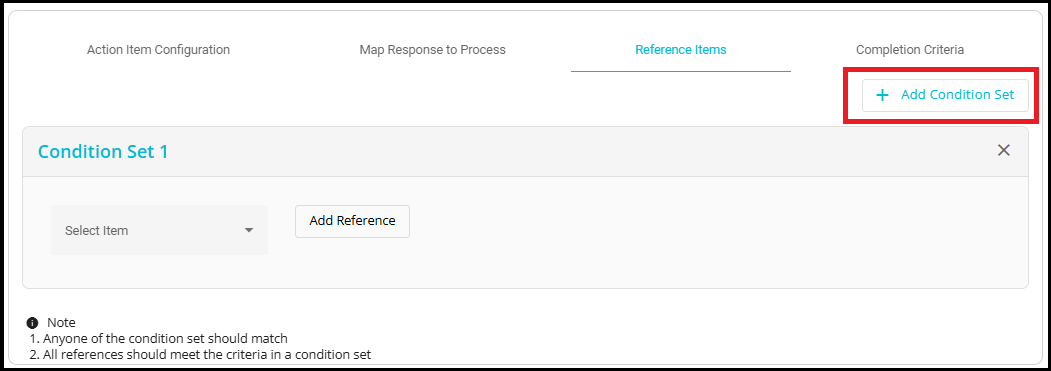
Click on the Select Item dropdown to view the list of available action items.
Select the required action item from the menu. The list displays action items that have already been configured in the workflow.
After selecting the action item, click Add Reference to add it as a reference within the condition set.
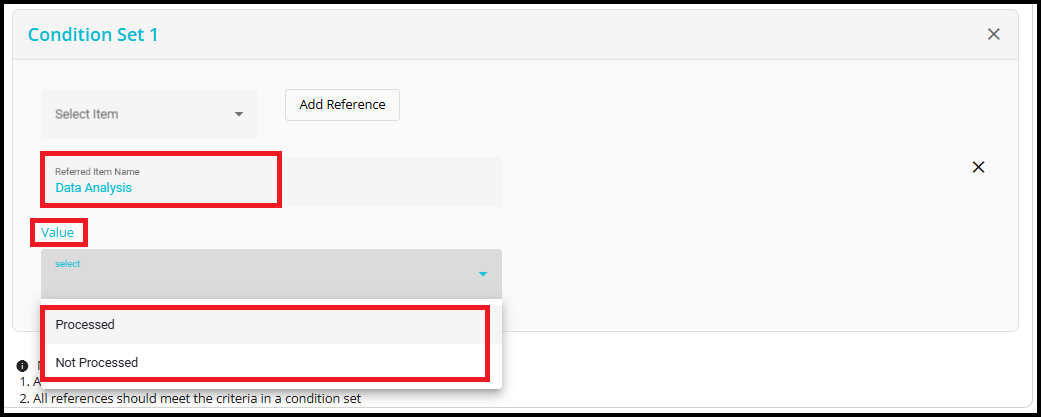
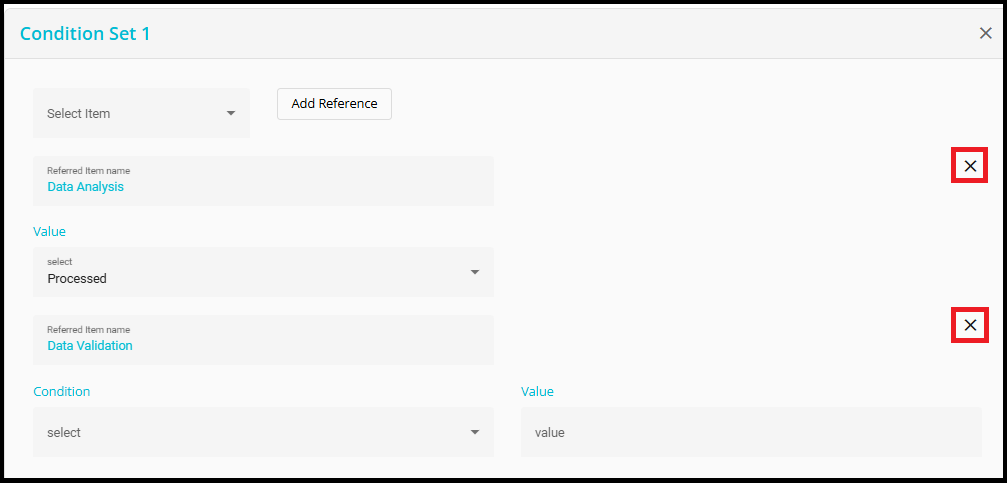
- Referenced Item Name is the action item or system you have selected to act as a reference for your condition.
The fields that appear for the referenced item depend on the configuration made to that system in the Response Configuration tab:
If the response type is set to Radio Button or Checkbox:
A Value field will appear in the reference configuration.
The options available in the Value dropdown are the same as those configured in the Response Configuration tab for that action item (e.g.,"Processed","Not Processed").
You simply select the value that should be matched for the reference condition to be satisfied.
If the response type is set to Text:
- Both a Condition field and a Value field will appear.
Example: For the system Data Validation, the response type selected in the Response Configuration tab was Text. So, when Data Validation is selected as a reference for any other system in the Condition Set, you will see both Condition and Value fields.
The Condition dropdown provides operators such as "Equals", "Not Equals", "Contains", "Does not Contain", etc.
You can specify the condition and the value to match the text response.

Within a Condition Set, you can add multiple references by clicking Add Reference.
All references within a condition set must meet the defined criteria for the condition set to be considered successful (AND logic within a condition set).

- You can click on the X icon to delete the reference if it is no longer required.
- You can add multiple conditions by clicking on the Add Condition Set.
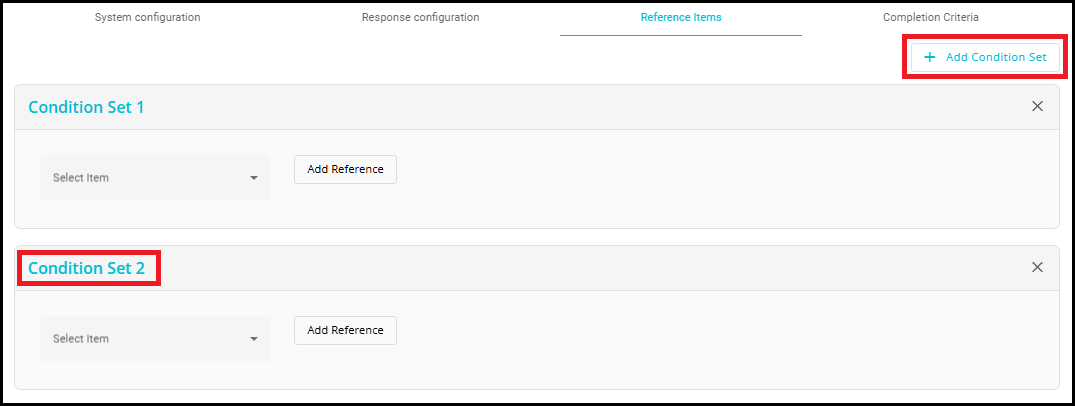
- To remove a condition set, click on the X icon corresponding to that condition set.

When multiple Condition Sets are configured, the system evaluates them using OR logic.
This means that if any one of the condition sets matches, the reference condition is satisfied, and the next action item is created.

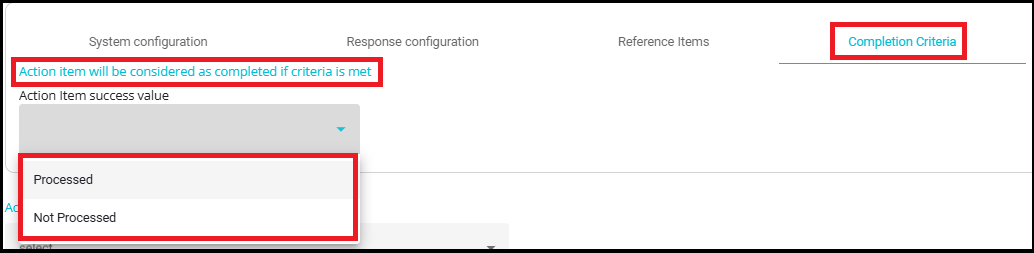
Completion Criteria:
The Completion Criteria tab allows you to define the conditions under which an action item will be considered as completed. This is crucial for tracking the progress of each action item in the workflow.
- The fields that appear in the Completion Criteria tab depend on the Response Configuration of the system for which you are creating the action item.
If the response type is set to Radio Button or Checkbox, you will see an Action Item success value dropdown.
Here, you can select from the predefined options (e.g., "Processed", "Not Processed") that were configured in the Response Configuration tab.
The action item will be considered as success when the selected value is matched.
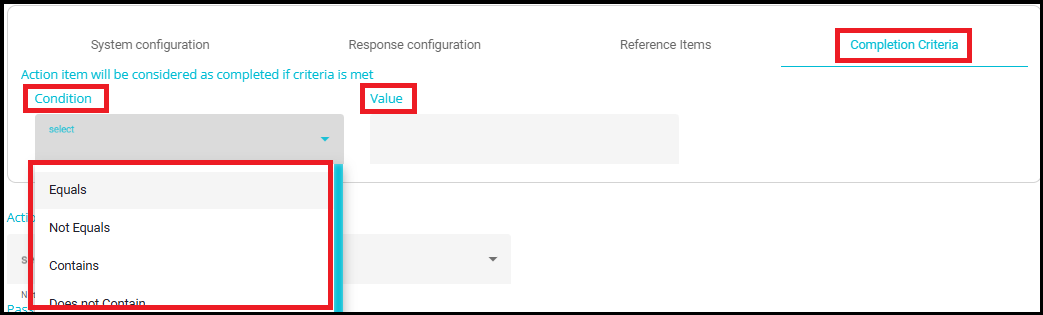
If the response type is set to Text, you will see both a Condition and a Value field.
The Condition dropdown lets you choose operators such as "Equals", "Not Equals", "Contains", "Does not Contain", etc.
The Value field allows you to specify the text that must be matched according to the selected condition.
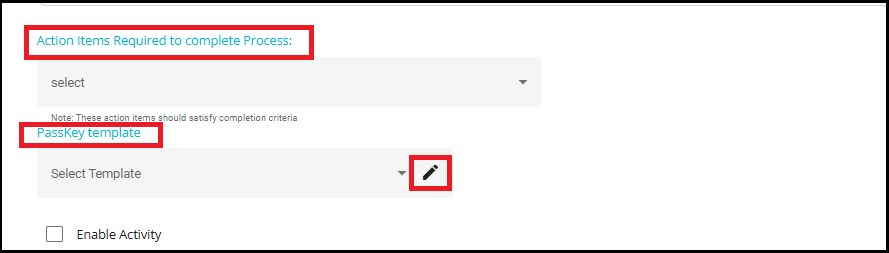
Action Items Required to Complete Process
The Action Items Required to complete Process dropdown allow you to specify one or more activity items that are essential for process completion.
Only when these selected activity items are finished (i.e., their completion criteria are satisfied), will the process move forward or be marked as complete.
Passkey Template
The Passkey template section lets you select the email template used to send the passkey (password) for encrypted attachments.
When a file or report is sent as an encrypted attachment, the passkey is delivered to the recipient using this template.
You can select the template from the dropdown and edit it by clicking the pencil icon. For more details on configuring email templates, please refer to "How to Configure Email Templates"
Note: If no passkey is provided, the system will automatically generate a unique passkey. However, if a user specifies a passkey in the flow, that same passkey will be sent via email, allowing the recipient to access the encrypted attachment.
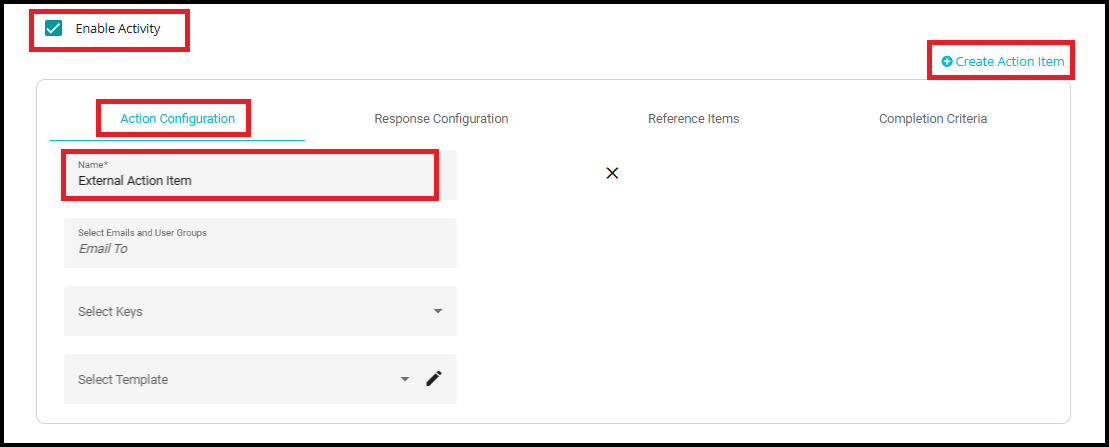
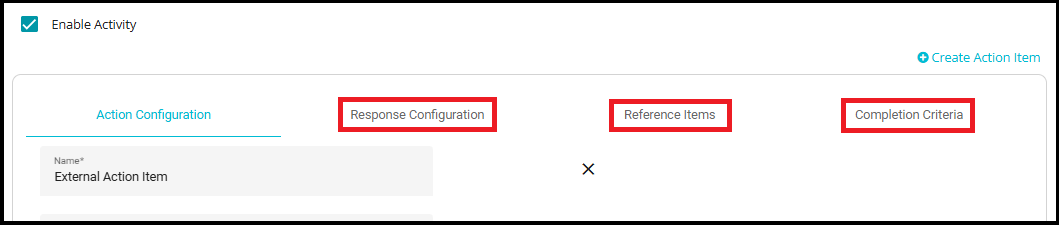
Enable Activity
If there are any external users (not registered in DGT), you use the Enable Activity checkbox.
This allows you to create activity action items that can be directed to individuals outside of DGT.
To create an action item for external users, click on the Create Action Item (located at the top right of the configuration panel).
You can create one or more action items by clicking this button multiple times. Each time you click, a new action item entry will be added, allowing you to configure and assign multiple tasks to different external recipients as needed.
Enter a name for the action item in the Name field under the Action Configuration tab.
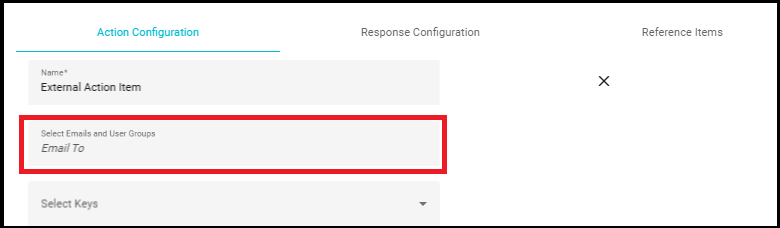
Select Emails and User Groups (Email To)
- Here, you select the email addresses and user groups to whom you want to send the selected template. These are the primary recipients of the notification or action item.
Select Keys
In this dropdown, you can select one or more keys to associate with the action item.
Note: The keys displayed in this menu are the keys configured in the 'In Validation' stage of the flow. For example, you might see options like "Requestor Type" or "Email" as shown in the image.
These keys help in mapping and tracking the action item with specific data points.

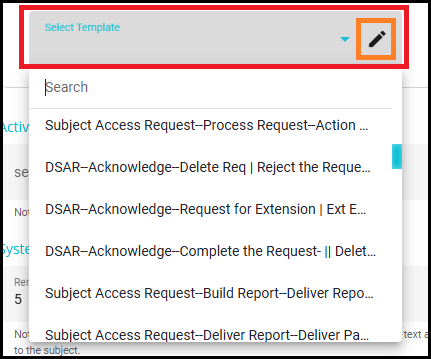
Select Template
Choose the email template you wish to send for this action item from the dropdown.
You can also edit the template by clicking the pencil icon. This template will be used for notifications related to the action item, ensuring the correct communication is sent to the recipients.
For more details on configuring email templates, please refer to "How to Configure Email Templates"
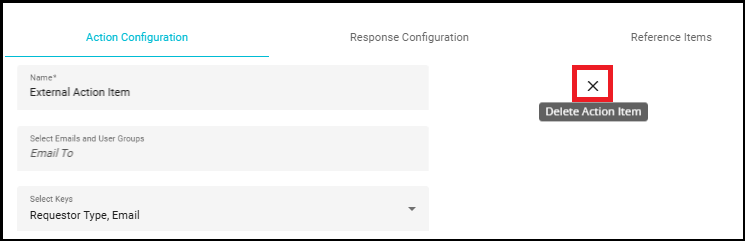
- To delete an action item, simply click on the X icon. This feature is especially useful when you need to correct or reorganize your workflow by removing unnecessary or duplicate action items.
- External users do not get access to the DGT platform; instead, they are navigated directly to the action item response UI page. This ensures that external participants can respond to assigned action items without needing full platform access, maintaining security, and simplifying their interaction.
NOTE: All the remaining tabs---Response Configuration, Reference Items, and Completion Criteria---are configured in the same way as Systems (Internal Action Items). This ensures consistency in workflow setup, whether the action items are managed by internal DGT users or assigned to external participants.
Activity Items Required to Complete Process
You use this dropdown to specify one or more activity items that are essential for process completion. Only when these selected activity items are finished (i.e., their completion criteria are satisfied), will the process move forward.

System Action Item Mail Reminder - After sending the Action Item to the users, this field is used to configure reminder mails in case of no/delayed response. This is especially useful when additional information is needed for process action items, and you want to ensure users respond in a timely manner.
- Remind in Days: you can specify the number of days after which the reminder email should be sent to the users.
For example, if you set Remind in Days to 5, the first reminder will be sent on the 5th day after the request is submitted.
- Reminder Frequency: used to specify the number of times the reminder email should be sent to the users.
For example, if Reminder Frequency is set to 2, the system will send two reminders:
The first reminder on the 5th day
The second reminder on the 10th day (5 days after the first reminder)

The Process action item completed admin template is an email format used to inform administrators that the action items in this stage have been processed and completed. You can select the required email template from the dropdown and edit it by clicking on the pencil icon.
The On Process action item additional information required template is used to ask for additional information if needed for process action items.

- However, you cannot select the template for additional info directly in the process configuration. Instead, you need to configure it in the Acknowledge phase under the In Process section.

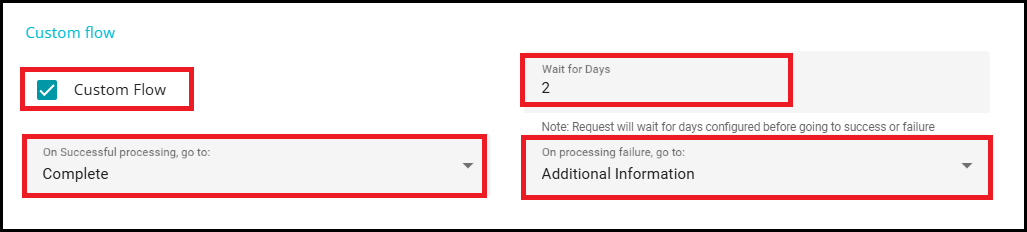
Custom Flow
You can define the 'Custom Flow' option in the In Process stage of the request. Checking this option pops up three selections.
- On successful processing, go to: This dropdown lets you select the next stage the request should move to if processing is successful.
Example: If you select "Complete," the request will proceed to the completion stage after successful processing.
- Wait for Days: This field allows you to specify a waiting period (in days) before the request moves to the next stage.
Example: If you enter "2," the request will wait 2 days before transitioning to the next stage, as configured.
- On Processing Failure, go to: This dropdown lets you select the next stage the request should move to if processing fails.
Example: If you select "Additional Information," the request will move to the Additional Information stage if processing is unsuccessful.